
Dirty Paver Restoration
- At January 9, 2012
- By LaDawn
- In Paver Restoration, Recent Projects
 0
0
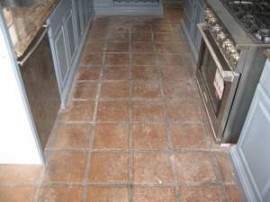
Before
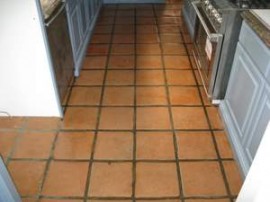
After Restoration
Paver floor needs full restoration! This paver floor was stripped, cleaned, and sealed for a full paver restoration. Stripping the pavers preps the tile for the cleaning and sealing process. Once stripped, the floor is ready for a gentle hand clean and seal. Pavers are a delicate tile that must be handled with care and expertise. This paver floor looks great!
Paver Floor Maintenance
- At December 14, 2011
- By LaDawn
- In Paver Restoration, Recent Projects
- 0
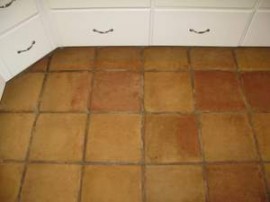
Before

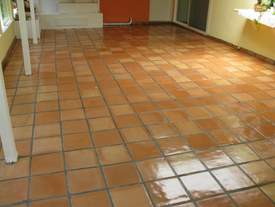
After Maintenance
Paver floor needs maintenance! Every day wear and tear can leave paver floors with less luster. Well maintained paver floors do not always need a full restoration. Paver floor maintenance is the best approach for pavers that do not need a full restoration process. A good clean and seal was all it took to get this paver floor’s shine and luster back!
Dirty Paver Clean and Seal
- At December 6, 2011
- By LaDawn
- In Paver Restoration, Recent Projects
- 0

Paver Cleaning and Sealing Before
After Paver Clean and Seal
Newly installed paver floor in need of shine! With a new paver floor stripping is not always necessary. Paver cleaning and sealing was used to bring this floor back to life. Gently hand-cleaning and sealing this paver floor were the steps taken in this paver restoration process. This floor now looks shiny and new again!
Exterior Paver Cleaning & Sealing

Exterior pavers suffering from mold & mildew. Long overdue for clean and seal maintenance without the need for complete stone restoration.

This is a gorgeous exterior paver floor, but it will take some cleaning and sealing to see it.

The roof overhang drips on this side of the house and keeps these pavers wet most mornings.

The owner has pressure washed with bleach a few times. He surely had an immediate improvement but didn't realize the action would slowly destroy his sealer and allow the pavers to remain saturated. They became an incubator for mold and algae.

I said they were gorgeous! We'll have to seal them now with a premium penetrating sealer - It will protect the paver floor but will not affect the appearance in any way.

They are still wet in this photo. Having been thoroughly cleaned, we will let them dry and seal with a premium impregnator.

Sure to be another satisfied paver maintenance customer.
Solvent Stripping vs. Water-Based Stripping
Water-Based stripping products are very effective, however often paver floors will need solvent stripping to provide superior results. Ultimately each paver floor is unique and an owner’s expectations will dictate the exact procedure to follow.

These pavers are buried under years of grimy, aging, grayish wax. The finish is chipped, deeply scuffed and scratched. The owner wanted to spruce them up and liked the idea of a traditional "rustic" appearance. A perfect candidate for water-based stripping.

This paver floor looks great, just look at that color glow, however it is far from perfect. The grout lines are less than uniform and many tiles have streaks of old wax. Deep brown stains are evidence of the floor having once been colored or stained. This is most obvious to the right of the photo towards the base of the bed. This owner was astonished at how well it came out yet there are others that would have wanted better. Solvents could have greatly improved this floor but does it really need it? Only you can decide!

We'll perform a water-based paver strip on this one if you insist, but warn you, it will look very nice, but definitely not gorgeous. If you want better, we'll have to use solvent-based stripper. This owner convinced us to try the water-based process but switched to solvents shortly thereafter.

The area within the circle has been stripped with a very powerful water-based stripper. The cloudy, grayness is goneand the grout lines are much clearer. A much improved paver floor, however this process will NOT remove all of the existing sealer and finish. The remaining finish is trapping dirt and grime underneath it. Our owner was not sure at this point so we did a larger area: Next Photo

The upper half of this paver floor has been stripped with water-based stripper. Again the floor is much improved, however the grout lines are far from perfect and there are deep stains under a thin coat of floor finish that will NOT strip. This paver floor would look very nice once re-sealed and finished, but our owner has now decided to upgrade to a solvent-based stripper for an even better result!

Lower half of this photo illustrates solvent-based paver restoration. Notice that the floor is bright and clear. At this point there is very little of anything left on the paver surface. A second application of solvent-based stripper will clear the floor just a bit more and it will be ready to seal with your choice of sheen level, colorants or stains - acheiving an even better result than the original finish at the time of installation!

This paver floor has been restored and now coated with 5 coats of sealer and 4 coats of high sheen finish designed specifically for pavers. It will not yellow or gray with time and does not react to UV light. It is a superior coating in appearance and durability. We have no competitor that would even imagine of building such a finish!
Mexican Pavers Staining Coloring Before Grout

These Mexican pavers are being stained prior to grout to deliver a sharp contrast between the paver and final grout color.

Look at this mess. The installer is a really nice guy and performed a good installation. Unfortunately for our owner, his cleanup should have been much better. We had to refer her to the section in our contract concerning the removal of excessive construction and installation debris. Hint: If your floor looks like this after installation, you need to have a talk with your installer.

The white thinset left over from installation is removed meticulously by hand. The upper right hand corner has now been cleaned and is in the condition that the installer should have left it in the first place. The owner elected to spend a pretty penny to have our highly skilled applicators perform this additional cleaning in order to keep her project on time.

A total of 5 colors are actually hand-applied to this floor in varying degrees of intensity. The final look will be created with multiple layers of color. This floor is being stained prior to grouting because the owner wants a dramatic contrast to a lighter grout.

More colorants are applied

More and more colorants are applied. We encourage the owner to stick around during this phase to help shape the final appearance of the floor and ensure satisfaction.

The staining and coloring is finally complete. A very substantial pre-seal has also been applied at this point to protect the surface during grouting. Please note that a paver floor is often stained after grouting rather than the method you are reviewing here. The difference is that the grout will be stained as well. Staining after grouting will still yield a beautiful floor and usually saves time.

Once the floor was grouted we made a handful of touchups to the stain. This installer grouted very carefully with a bag as required for optimum results with a stained floor. A sloppy installer or one who attempts to grout too much, too fast can severely scratch the surface of the pavers, removing the recently applied stain. We do not mind a few touchups, however occasionally a floor will be severely damaged due to poor grouting. In these cases repair costs can be significant. The floor was coated with sealer and a high sheen finish designed specifically for pavers. It allows for vapor transmission, will not yellow and does not react to UV light.

What a beautiful floor! Our coating is superior in appearance and strength. We have no competition that would even imagine building such a finish!
Paver Staining after Grouting Lincoln Pavers

Applied Stain colorant to new paver floor – sealed with low sheen, matte finish.

This paver floor has just been installed. You should take note of the darker grout lines towards the top of the photo. This was suspected moisture from the install, but turned out to be mostly grout smears and residue. This became evident when we started cleaning the floor on our hands and knees.

Here is a close-up while wet . The grout has been left on the edge of the tiles. We were able to remove this grout and properly clean the floor.

The floor has been thoroughly cleaned and detailed by hand. It is now ready for stain. Two samples are lying on the floor. The one with the label was prepared for the owner during the initial consultation along with a handful of others that she wanted to see on her own batch of pavers. This is often done after a proposal for work has been accepted by the owner. We'd like to believe that we can achieve any color or look that you can imagine but it is always good to be sure. The other one has been prepared today on the jobsite to assure a match. Let the staining begin!

The upper right corner has been stained with a single coat. This floor will require at least 2, if not 3 coats and some more stain to the grout lines. In this case, the floor is being stained after grouting. Therefore the grout will also be stained. It will always retain its individuality from the pavers, however will tend to soften the transition from grout to paver. Always a great look!

This paver floor has been stained with three coats for the most part. In this case more stain has been applied to some of the lighter stones in an effort to give the floor a more uniform appearance as per our owner's request.

Another angle of the same beautiful floor. You may notice what appears to be stain on the lower area of the walls. This is actually grout residue left over from the installation. We take great care not to stain anything but the floor.

A very substantial low sheen finish has been applied. This finish has been designed specifically for pavers allowing moisture vapor transmission. It will not yellow or deteriorate from UV light.

It may look glossy in this photo, but this is far from a high sheen finish. This finish is a low sheen matte and will provide strength to the surface and protect the pavers and grout from ground-in dirt, stains and scuffs.

What else can we say? Another soon to be satisfied customer (she won't be here for another 15 minutes)

Check out the awesome movement in the pavers. Stain will bring out the best and the worst markings in a paver. Make sure your installer is very familiar with pavers. This is not ceramic tile!
A comment from the owner:
“Thanks so much for everything. The floors turned out exactly how I wanted them. I would highly recommend you to all my friends. I wish I could sleep on these beautiful floors tonight!”